Bigger Diesel
Factory Royal Enfields fitted with the Greaves diesel engine were just 325cc's; this makes them the smallest capacity Enfield Bullet ever produced. Couple this with being a diesel and you have little to shout about in performance terms; but to be fair this was never the reason for producing them, economy and ruggedness were their shining attributes and being fan cooled also negated the usual Bullet vice of being apt to seize.

Transfer such a bike to the UK and things get a bit tougher, traffic speeds are a lot higher and the tendency is to push the little engine to the limits on every journey.

Now don't get me wrong here; I love this engine to bits, but one can't help pulling it apart to see what can be done.


So What Can be Done?
Well as our American cousins are fond of saying "there aint no substitute for cubes", so one of the first things that must be considered is a capacity increase.

The Greaves engine is almost a direct copy of the Lombardini 6LD325 for which parts are available from various suppliers in the UK. Looking through the workshop manual for the 6LD series shows capacities of 360, 400 and 435 being available. Sluggy's engine is already a 360cc version, so this leaves 400 or 435. Speaking to a very knowledgeable chap behind the counter at Bryco Industrial Engine, I was advised against the 435 as this is known to give heavy vibration. So 400 it is then!

When purchasing the parts I chose to buy a new barrel as well as the piston rings and gasket set, this would (I thought) make the job an easy parts swap and should be done in an afternoon - Hmm great plan
Here are all the parts laid out ready to start, the cup of coffee is the most essential.

Note that the piston contains the combustion chamber, this depression has a raised peak in the centre and this creates the swirl within the air charge that promotes complete combustion.

If you look carefully you will see there are 2 head gaskets supplied, these are the copper rings, one is on top of the barrel. They are supplied in different thicknesses so you can set the correct piston to head clearance of just 0.7mm. Any tighter and you risk the piston hitting the head, any looser and you loose compression and therefore power.
Here are the old and new barrels side by side for comparison, note that the old one has much bigger fins, this is why I said that the Greaves is almost a direct copy, it appears that Greaves have made some modifications to allow the engine to operate in the tropical climate.

Another very Subtle difference is the cutaway for the pushrod tube (half circular on the right), this was to be the reason why a direct swap could not be done. I have no doubt that a thinner pushrod tube could be made and installed but I decided that it would be better to retain the larger cooling capacity of the older barrel so off it went to Gosnays engineering in Romford for boring out to fit the new bigger piston.
Here are the two pistons side by side. note the scuff marks on the old one - I have seized the motor 3 times so far by pushing it too hard uphill. To be fair it's not all my fault the regulator was not setup correctly when I acquired the bike and was injecting too much fuel into the combustion chamber. See the heavy layer of carbon - this was one of the results of over injecting; as any diesel tuner will tell you, putting too much fuel into a diesel will sharply raise the combustion temperature and will lead to a seizure.

How do you know when your over-fuelling; look for the black smoke emitting from the exhaust.

All diesels have a 'Max Inject' volume setting on the injector pump, this is the maximum fuel delivery that the engine can burn and needs to be set carefully. It is possible to restrict both the power (by the max inject) and the speed (max throttle) of any diesel engine and this is why they tend to last so long as fleet vehicles.

For running in purposes I shall lower the Max Inject setting to ensure that safety margins of combustion temperature are maintained.
Not immediately obvious in the above picture but the old piston has 3 compression rings plus the oil control ring, the newer version has just 2 compression and one oil control ring. After speaking to the 'man who knows' behind the counter at Gosnays the additional ring will create much additional friction and therefore heat which may have contributed to the seizures.
Here's a quick view down what's left of the engine - note the almost comically oversize conrod (with replaceable little end bush).

One of th best features of this engine is that it can be stripped completely whilst still fitted into the bike, we have already removed the head and barrel.

As there is a real sump that can be unbolted and the conrod has a car type shell bearing the big end can be swapped with the engine in-situ. Simply unbolt the sump, unbolt the conrod cap and slip in some new shells.

The crank is a massive one piece cast iron affair and can be removed from the flywheel side; the main bearing on that side is held in a large carrier and removing this will allow the crank to be withdrawn through the hole left behind after removing the carrier.
Here's the new barrel and piston going on, I usually find it easier to install the piston into the barrel far enough to allow the gudgeon pin to be fitted afterwards. Word of advice - fill the crankcase mouth with a cloth before attempting to install the retaining circlip - it will save tearing down the bottom end to retrieve it when 'not if' you drop it.
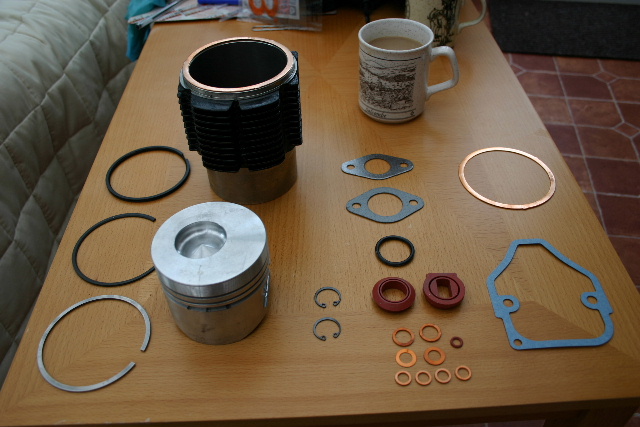
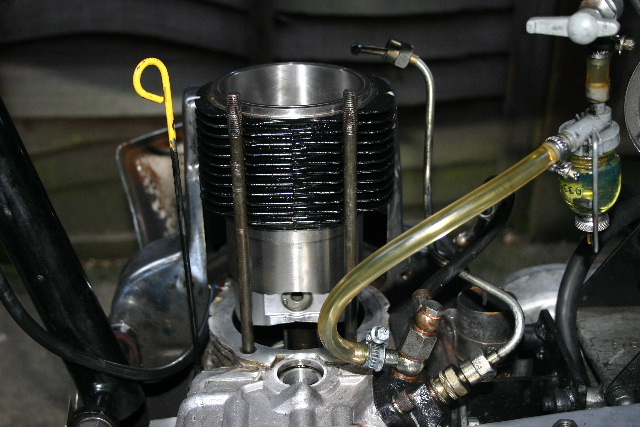
So barrel and piston installed, and it's time to refit the head. On this type of motor it's vital to get the correct head to piston clearance, in this case 0.6-0.7mm. The approved method is to set the piston at TDC and place a straight edge over the barrel and measure the gap to the piston crown with feeler gauges - easy done 0.3mm. Subtract this figure from the required clearance and you get 0.3-0.4mm - this is the head gasket thickness needed.

First problem - the thinnest available is 0.55 so I fitted this and then torqued the head down and remeasures the piston clearance with the old 2 stroke tuners "bit of solder down the plug hole" technique, although in this case it's the injector. So poke a bit of solder in the chamber and ease the piston over TDC, remove the solder and measure with a micrometer - 0.65mm bang in the middle.

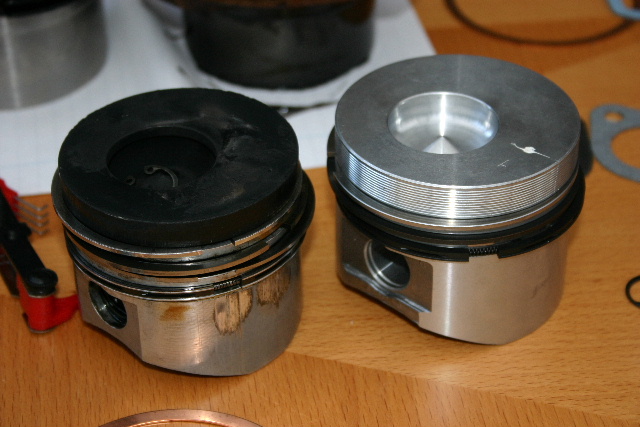
A bigger gap means a lower compression and lower power, but too close and the piston could hit the head with disastrous consequences.

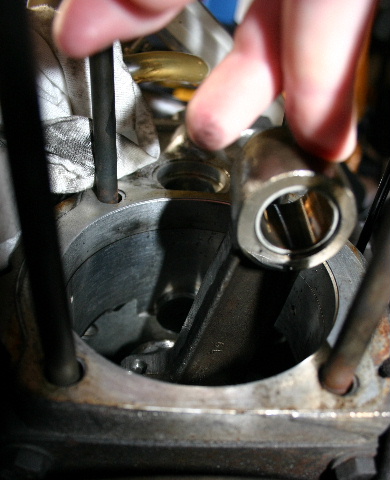
So, reassemble the injector,rockers and pushrods, squirt a bit of oil over the valve gear, put the top cover on and its time to go for engine start.

Ease the engine over compression with the kick starter, listen for the injector to "gronk" and the decomp lever flicks off, gather forces and take a swing at the kick starter. Of course there is a bit more air to compress now and a better sealing piston to boot - consequence; the engine bounces off compression and i spend the next few minutes limping around the driveway cursing under my breath - repeat the experience three more times.

On the fifth time I was successful and the bike starts with a big bang and a large amount of smoke from the 2 stroke oil I've lubed the barrel with but settles down to an uneven beat as the regulator tries to keep the cold engine running.- Huston we have ignition!

I left the injector pump settings as they were for a few days to allow the piston and rings to bed in, then opened the max inject setting by a quarter of a turn.

The result is the bike will now climb Warley hill in top gear and will hit 50mph in most conditions. The vibes are worse though, a result of the heavier piston no doubt. I'm toying with the idea of another tooth on the gearbox sprocket as this should improve the top speed to the mid 50's.

All in all - a great success!